2016年11月7日 星期一

Taiwan ancient buildings recognition by Convolution Neural Network

Overview

       The Alex net is applied to recognize 4 different types of Taiwan ancient buildings in this article.

Motivation

      I'm new to Deep Learning, so I want to do some exercise to warm up.  And since it would be interesting and meaningful to combine the technology together with the culture, I apply the Alex net to recognize 4 different types of Taiwan ancient buildings.

Introduction

     The ancient buildings in Taiwan can be categorized into 4 types:

1. The traditional Chinese buildings:  Many of Taiwanese are successors of the immigration who emigrated from China about hundred years ago.  Therefore, many old buildings are ancient Chinese buildings.  The following figure shows the traditional residence.


2. The traditional Japanese buildings:  Taiwan has been colonial ruled by Japan for about half of the century. Therefore, there're many traditional Japanese buildings left.  The following figure shows the Japanese temple located in Taoyuan.

3. The baroque style buildings:  During the Japanese colonial period, several government buildings are designed as the Japanese Baroque style.  These buildings are popular in Japan during the Meiji period. Thus, this category is labeled as Japanese modern in the present work.  The most famous building of this style might be the Presidential Palace of Taiwan, as shown follows.

4. The modern Taiwan buildings:  The word "modern" here refers to those buildings that constructed during the Early Revival Period.  I'm not quite a fan of these kinds of buildings.  However, these buildings still in everyone's childhood memory.  Thus, these buildings are also recognized by the network.


Data Sets

       The collection of data is very time-consuming. And since there are only countable historic buildings in Taiwan as well as not every building in these kinds are posted to the internet, I suddenly ran out of data to train the net.  Therefore, some of the buildings in Chinese and Japanese are also collected.
       After all, I spend a whole data to collect all of the following data!  However, the training set seems too few to train an Alex net, though...
      The collected data are listed below (25% of these data are used to calculate the validation):
Traditional Chinese Buildings: 159
Traditional Japanese Buildings: 152
Modern Japanese Buildings: 169
Modern Taiwan Buildings: 119


Result

       The training result is shown as follows.  After 30 epoch, the final accuracy (validation set) is 66%.
Several results in the test set are shown below:


       Although the training data are quite insufficient, the result seems acceptable: up to 2/3 buildings are classified correctly.  And it might get better performance if more and more data are included.  Also, the Alex net seems to be capable of solving problems like this.  Therefore, it's more reasonable to collect more data than design more complex neural network if one want to improve the predictions.


2016年11月2日 星期三

Nemiver - A wonderful tool for tracing code and debug in Linux

Overview

    This article will introduce a package that can facilitate tracing code and debug in Linux.

Motivation

    In my opinion, to see how the program run is the best way to understand its implementation.  Therefore, I often use debugger to explore a program at the first time.  By using the debugger, you can not only see which code block is actually accessed by a process but also save a lot of time to include all header and source files (as you might do for code editors) since all you need is feed the debugger with the binary program.
    However, the traditional tools in Linux (such as gdb or DDD) are not user-friendly, such as not display the code as colorful texts as well as the texts size can't be adjusted, as shown follows.  In the next section, I'll introduce a new tool that can remedy these drawbacks.

Nemiver   

     Nemiver is a Debugger that I have found recently.  As shown below, it not only display the code gracefully, but also be able to change the text size and editor theme.  The following code is about to perform Merge Sort to std::list.  As you can see, the lower half panel display the value of each local variables and even each elements of the std::list.  Furthermore, if the process is in the member function of a certain class, you can also see the data member displayed.

Trouble Shooting

    Sometimes you might encounter the following situation (a window pop out and says "Cannot find file '/build/.../linux/raise.c'..."), it might due to an exception thrown by your code or the process fail to pass a certain assert statement.

You can click the "Target Terminal" tab in the bottom of panel to get more information.

2016年9月22日 星期四

How to build Point Clouds from RealSense driver in Linux

Overview  

    This article will illustrate how to feed the raw data from RealSense driver (in Linux) to the Point Cloud Library.

Background

    One can apply the RealSense SDK to perform some fascinating features in their application with ease.  Unfortunately, if you develop your APP in Linux, there's no such good things (at least when I wrote this article).  One way to go further is to transport the raw data from RealSense driver to OpenCV or Point Cloud Library (PCL). There're some hints for the former such as here (see Lesly Z.  Thu, 08/11/2016 - 03:29), while the tutorial of the latter can't be found easily and is what this article aimed for.

Solution

   There's an example shipped with the RealSense driver that teach you how to build PointCloud from libRealSense.  However, if you want to apply the PointCloudLibrary utilities to it, you should further convert it to the PCL format.
    In this article, I wrap such conversion and the device data extraction in a class called RealSenseController, which can be used as follows:
RealSenseController realSenseDevice;

while(true)
{
                realSenseDevice.Update();
                realSenseDevice.CalculatePointCloud();

                pcl::PointCloud<pointxyzrgb>::Ptr currentPointCloud = realSenseDevice.GetPointCloud();
                DoSomeThing(currentPointCloud);
}

in which the RealSenseController::Update() will update the current depth and color image from the device, and RealSenseControllers::CalculatePointCloud() will compute the PointCloud base on such depth and color image.

This class is defined as below:
class RealSenseController
{
        public:
                void Update();
                const cv::Mat& GetColorImage() const;
                const cv::Mat& GetDepthImage() const;
                const pcl::PointCloud<pointxyzrgb>::Ptr GetPointCloud() const;
                void CalculatePointCloud();


                RealSenseController();

        private:
                rs::context deviceList;
                rs::device* cameraDevice;
                rs::intrinsics depthIntrinsicTransform;
                rs::extrinsics depthToColorTransform;
                rs::intrinsics colorIntrinsicTransform;

                cv::Mat currentColorImage;
                cv::Mat currentDepthImage;

                pcl::PointCloud<pointxyzrgb>::Ptr pointCloud;

                void initializeDevicesController();
                void initializeCameraDevice();
                void enableALlVedioStreams();
                void initializeDeviceTransforms();
                void updateColorImage();
                void updateDepthImage();
                rs::float3 getDepthPosition3D(size_t rowIndex_, size_t columnIndex_);
                cv::Vec3b getColorRelateToDepthPosition(rs::float3 depthPosition3D_) const;
                bool isColorPositionValid(rs::int2 colorPosition2D_) const;
                rs::int2 convertToNormalPixelFormat(const rs::float2& colorPosition2Dfloat) const;
                PointXYZRGB createPointXYZRGB(rs::float3 position3D_, cv::Vec3b pointColorBGR_) const;
                float getDepthValueInMeters(size_t rowIndex_, size_t columnIndex_) const;


};


Following is the initialization of the RealSenseController:
RealSenseController::RealSenseController()
 : deviceList(),
   cameraDevice(),
   depthIntrinsicTransform(),
   depthToColorTransform(),
   colorIntrinsicTransform(),
   currentColorImage(),
   currentDepthImage(),
   pointCloud(new pcl::PointCloud<pointxyzrgb>() )
{
        this->initializeDevicesControlCenter();
        this->initializeCameraDevice();
        this->enableALlVedioStreams();
        this->cameraDevice->start();
        this->initializeDeviceTransforms();
}

void RealSenseController::initializeDevicesController()
{
        int numberOfRealSenseDevicesConnected = this->deviceList.get_device_count();

        if (numberOfRealSenseDevicesConnected == 0)
                throw RealSenseNotConnectedException();
}
void RealSenseController::initializeCameraDevice()
{
        this->cameraDevice = this->deviceList.get_device(0);
}
void RealSenseController::enableALlVedioStreams()
{
        this->cameraDevice->enable_stream(rs::stream::color, rs::preset::best_quality);
        this->cameraDevice->enable_stream(rs::stream::depth, rs::preset::best_quality);
}
void RealSenseController::initializeDeviceTransforms()
{
        this->depthIntrinsicTransform = this->cameraDevice->get_stream_intrinsics(rs::stream::depth);
        this->depthToColorTransform  = this->cameraDevice->get_extrinsics(rs::stream::depth, rs::stream::color);
        this->colorIntrinsicTransform = this->cameraDevice->get_stream_intrinsics(rs::stream::color);
}


      The following function will update the color and depth image from the device and store it to the cv::Mat in OpenCV, since the format of the device raw data and cv::Mat are similar and can be expected to convert efficiently.
void RealSenseController::Update()
{
        try
        {
                this->cameraDevice->wait_for_frames();
        }
        catch(...)
        {
                std::cerr<<"Device->wait_for_frames() times out\n";
        }
        this->updateColorImage();
        this->updateDepthImage();
}
void RealSenseController::updateColorImage()
{
        const void* deviceColorData = this->cameraDevice->get_frame_data(rs::stream::color);
        cv::Mat colorTemp = cv::Mat( this->colorIntrinsicTransform.height, this->colorIntrinsicTransform.width, CV_8UC3, const_cast<void*>(deviceColorData) );
        cv::cvtColor(colorTemp, this->currentColorImage, CV_RGB2BGR);
}
void RealSenseController::updateDepthImage()
{
        const void* deviceDepthData = this->cameraDevice->get_frame_data(rs::stream::depth);
        this->currentDepthImage = cv::Mat(this->depthIntrinsicTransform.height, this->depthIntrinsicTransform.width, CV_16UC1, const_cast<void*>(deviceDepthData) );
}


Note:  1. One should call rs::device::wait_for_frames() before getting any data from device.
               Moreover, that function might throw exception if device times out (no data received from
               device over some period).  In this case, I just ignore it and keep trying to get data.  Most of
               the time, the device will recover and continue to send data.
           2. The argument order of the cv::Mat constructor is column number first then comes the row
                number.
           3. The type of device raw data is "const void*", one should do const_cast<>() before feed it
                into cv::Mat.
           4.  The format of the color data is RGB, and should be changed to BGR which is widely
                adopted by OpenCV.

    Following code block perform the transformation from 2D depth and color image to form a PointCloud:
void RealSenseController::CalculatePointCloud()
{
        if ( (not this->currentColorImage.empty())and(not this->currentDepthImage.empty() ) )
        {
                this->pointCloud->clear();

                for (size_t i=0; i < (size_t)this->currentColorImage.cols; ++i)
                {
                        for (size_t j=0; j <  (size_t)this->currentColorImage.rows; ++j)
                        {
                                rs::float3 depthPosition3D = getDepthPosition3D(i, j);
                                try
                                {
                                        cv::Vec3b colorRelativeToDepth = getColorRelateToDepthPosition(depthPosition3D);
                                        PointXYZRGB currentPoint = createPointXYZRGB(depthPosition3D, colorRelativeToDepth);

                                        this->pointCloud->push_back( currentPoint );
                                }
                                catch(const InvalidPointException& error)
                                {
                                        // Neglect the NAN point
                                        continue;
                                }
                        }
                }
        }
        else
        {
                std::cerr<<"Color or Depth Image is empty, ignore the calculation this frame.\n";
        }
}
rs::float3 RealSenseController::getDepthPosition3D(size_t rowIndex_, size_t columnIndex_)
{
        rs::float2 depthPosition2D = { (float)columnIndex_, (float)rowIndex_ };
        float depthValue = getDepthValueInMeters(rowIndex_, columnIndex_);
        return this->depthIntrinsicTransform.deproject(depthPosition2D, depthValue);
}

///
/// This function will throw InvalidPointException, if the Point is invalid (such as there's no match from depth to color pixel.
///
cv::Vec3b RealSenseController::getColorRelateToDepthPosition(rs::float3 depthPosition3D_) const
{
        rs::float3 colorPosition3D_RelativeTo_depthPosition = this->depthToColorTransform.transform(depthPosition3D_);

        rs::float2 colorPosition2Dfloat = this->colorIntrinsicTransform.project(colorPosition3D_RelativeTo_depthPosition);
        rs::int2 colorPosition2Dint = this->convertToNormalPixelFormat(colorPosition2Dfloat);

        if ( this->isColorPositionValid(colorPosition2Dint) )
        {
                return this->currentColorImage.at<cv::vec3b>( colorPosition2Dint.y, colorPosition2Dint.x );
        }
        else
        {
                /*
                   The current Point do not have meaning, and should be ignored.
                */
                throw InvalidPointException();
        }
}
bool RealSenseController::isColorPositionValid(rs::int2 colorPosition2D_) const
{
        return ( (colorPosition2D_.x >= 0)and(colorPosition2D_.y >= 0)
                  and(colorPosition2D_.x < this->colorIntrinsicTransform.width)
                  and(colorPosition2D_.y < this->colorIntrinsicTransform.height) );
}

rs::int2 RealSenseController::convertToNormalPixelFormat(const rs::float2& colorPosition2Dfloat) const
{
        rs::int2 colorPosition2Dint;
        colorPosition2Dint.x = (int)std::round(colorPosition2Dfloat.x);
        colorPosition2Dint.y = (int)std::round(colorPosition2Dfloat.y);
        return colorPosition2Dint;
}
PointXYZRGB RealSenseController::createPointXYZRGB(rs::float3 position3D_, cv::Vec3b pointColorBGR_) const
{
        PointXYZRGB tempPoint;
        tempPoint.x = position3D_.x; tempPoint.y = position3D_.y; tempPoint.z = position3D_.z;
        tempPoint.r = pointColorBGR_[2]; tempPoint.g = pointColorBGR_[1]; tempPoint.b = pointColorBGR_[0];

        return tempPoint;
}
float RealSenseController::getDepthValueInMeters(size_t rowIndex_, size_t columnIndex_) const
{
        float depthScale = this->cameraDevice->get_depth_scale();
        size_t MAX_ROW_INDEX = (size_t)this->currentDepthImage.rows;
        size_t MAX_COLUMN_INDEX = (size_t)this->currentDepthImage.cols;
        if ( ( rowIndex_ < MAX_ROW_INDEX )and(columnIndex_ < MAX_COLUMN_INDEX) )
        {
                return (float)this->currentDepthImage.at(rowIndex_, columnIndex_) * depthScale;
        }
        else
        {
                return 0.0f;
        }
}


      The procedure of building PointCloud can be briefly summarized as follows:  1. Convert the 2D position in depth image to 3D depth position.  2. Transform such 3D depth position to the 3D position in the color coordinate.  3. Transform that position into 2D position in the color image, and get the color relative to the position.  4. Now, you have the 3D position and its color. The PointXYZRGB can be built from that.

Note:  1. For convenience, I define a simple structure that mimics the rs::float2 to store the 2D
               position of the color image:
namespace rs
{
        struct int2 { int x, y; };
};

          2. x is column, y is row.
          3. There might be some depth points that do not have their counterparts in the color image. At
              this circumstance, the  example of libRealSense seems to artificially assign it as white.
              However, this will result in too many invalid points near the origin (in my case, the final
              point cloud has 307K points while there're 279K points near the origin and has its color
              been artificially assigned as white).  It will be a disaster if you want to calculate the normals
              of that cloud (the calculation time will be at least 10 minutes).  The similar issues have been
              discussed here.  Therefore, I neglect such invalid points by throwing an
              InvalidPointException which will be caught and ignored by the
              RealSenseController::CalculatePointCloud() and continue the loop.

          3. Finally, you might want to remove the outliers.
              (a) The calculated point cloud (with points 38.2K):
          

              (b) The above point cloud with its outliers removed (with points: 37.9K):
         

2016年5月30日 星期一

Task System (Thread Pool)

Overview

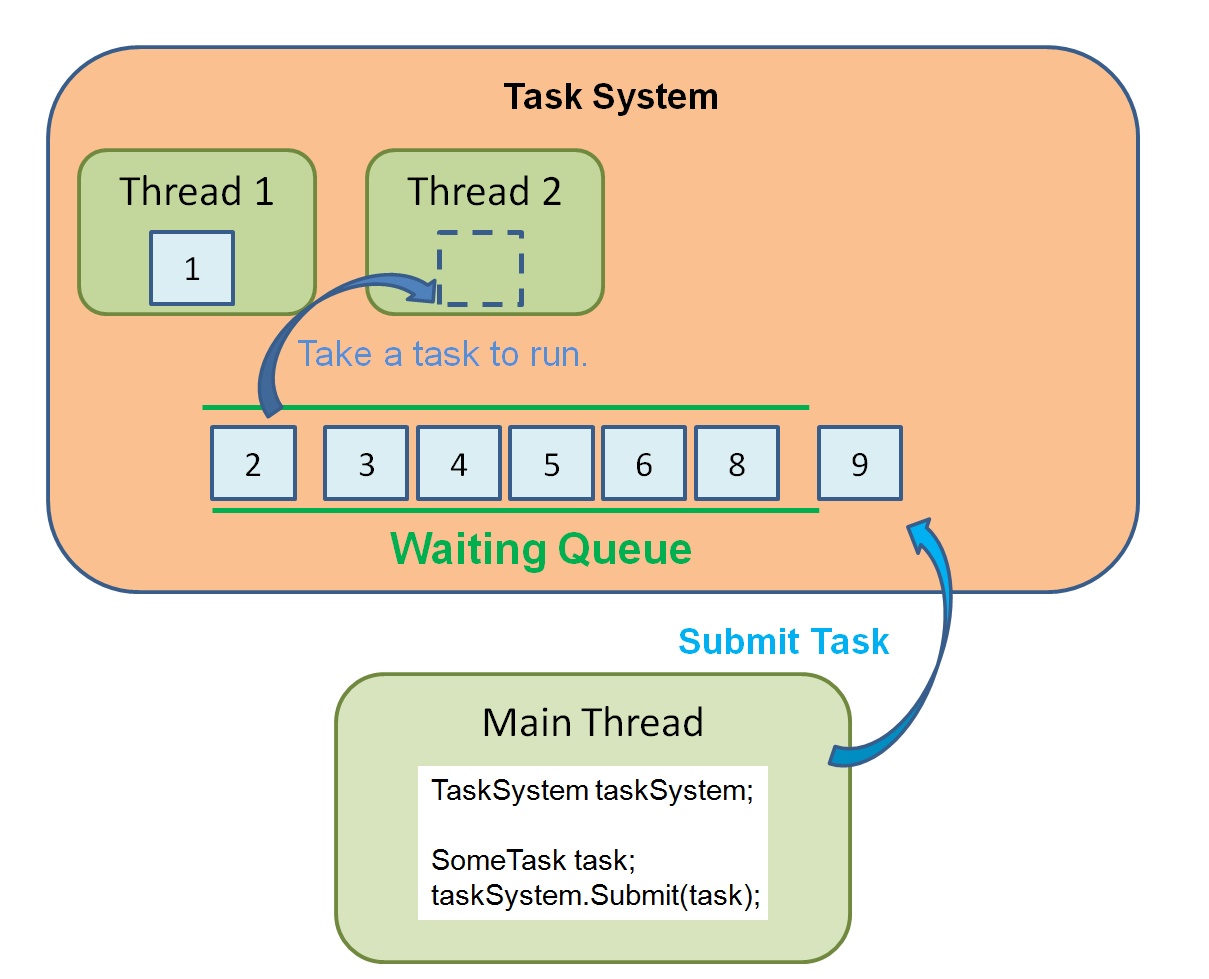
    This article is trying to implement a Task System by using C++11. A TaskSystem will create threads (at its initialization) and process tasks in parallel (see following figure). Each task can be defined and customized by the user.


Motivation

    After reading the "C++ Concurrency In Action", I want to do some exercise. Therefore, that's what this article about: Design and implement a Task System. Furthermore, I have seen an article that discussed about the difficulty to implement Task-Based Parallelism in C++. Therefore, this is what I temp to do here: to give an alternative way to approach the Task System in C++11.

Introduction

   As mentioned by Anthony Williams in his "C++ Concurrency In Action", there're  several circumstances that you might want to apply multi-threads:

1. Each thread perform different work: For example, you might want to use one thread for GUI, another for controlling the inner data so that the GUI can respond to user quickly. This might be the best situation to use threads.

2. Each thread do the same job but process different data: You might divide data into several chunks and submit each chunk to different threads. In this case, how do you split the data and how many threads is created (usually the same number as your processors) harshly effect the performance.

Task System

   The second case is what this article aim for. In that case, you might want to create threads as many as your processors at the beginning (since the creation of thread takes time). And then you can submit jobs (tasks) to those threads. The thread then processes your task and return its result in some way. This is what I call the Task System here (also called thread pool in "C++ Concurrency In Action").
   However, Bartosz Milewski have mentioned in this article that since the std::mutex as well as the thread_local keyword is Thread-Based instead of Task-Based, it has a potential difficulty to implement such Task System.

   In this article, I'd try to implement a simple Task System under two limitations:

1. The task will not migrate from one thread to another.

2. Once a task have been taken by one thread and is being processed, it will not be interrupted or be 'Context Switched' till the end of the task.

And its usage will look like follows (all of the code in this article should be compiled with C++11):
        TaskSystem taskSystem;
        taskSystem.Start();

        SomeTask task;
        std::future<ResultType> resultHolder = task.GetResult();
        taskSystem.Submit( std::make_shared(std::move(task)) );

        ResultType result = std::move(resultHolder.get());

    Here, the TaskSystem is created at the first line, then calling the TaskSystem::Start() will create threads (which will run the user defined task when you submit one). Then I create a Task (which should be inherited from TaskInterface), and get std::future from TaskInterface::GetResult(). Note that std::future is like a bridge between current thread and the work thread. You can hold it which will return the result when you call std::future::get(). At that time, the current thread will wait until the work thread finishes its task. Also note that the task is wrapped by the std::shared_ptr before it has been submitted so that the Task can be  deleted properly.
    The TaskInterface that every Task should inherit is shown as follows:
        template<typename Returntype>
        class TaskInterface
        {
                public:
                        virtual void Run(void) = 0;

                        virtual std::future<Returntype> GetResult(void) = 0;

                        virtual void Interrupt(void) = 0;

                        virtual ~TaskInterface() {};
        };

    The user should define what his Task should do by overriding the function TaskInterface::Run(). The return value is wrapped by std::future which can be obtained by calling TaskInterface::GetResult(). If you want to stop all tasks that have been submited to TaskSystem, you can call TaskSystem::Stop(). In this case, the TaskInterface::Interrupt() will be called if the task is still in the waiting queue of the TaskSystem. Finally, the virtual destructor should be overridden so that the derived class can be deleted properly in polymorphism.

    Here is the implementation of TaskSystem:
        template<typename TaskReturnType>
        class TaskSystem final
        {
                typedef std::shared_ptr< TaskInterface<TaskReturnType> > TaskPtr;

                public:
                        void Submit(const TaskPtr& taskPtr_);

                        void Start(size_t numberForProcessors = std::thread::hardware_concurrency() );

                        void Stop(void);

                        TaskSystem() : taskQueue(), listOfThreads(), shouldStop(false) {}
                        ~TaskSystem();
                private:
                        ThreadSafeQueue< TaskPtr > taskQueue;
                        std::vector<std::thread> listOfThreads;
                        std::atomic<bool> shouldStop;

                        // private functions
                        void WorkerThread(void);
        };

        // Implementation of TaskSystem
        template<typename TaskReturnType>
        void TaskSystem<TaskReturnType>::Submit(const TaskPtr& task_)
        {
                this->taskQueue.Push( task_ );
        }

        template<typename TaskReturnType>
        void TaskSystem<TaskReturnType>::Start(size_t numberForProcessors_)
        {
                try
                {
                        for(size_t i=0; i < numberForProcessors_; ++i)
                        {
                                this->listOfThreads.push_back(
                                                                std::thread(&TaskSystem::WorkerThread,
                                                                            this)
                                                             );
                        }
                }
                catch(...)
                {
                        this->shouldStop.store(true);
                        throw;
                }
        }

        template<typename TaskReturnType>
        void TaskSystem<TaskReturnType>::WorkerThread(void)
        {
                while(not this->shouldStop.load())
                {
                        try
                        {
                                TaskPtr taskPtr = *(this->taskQueue.TryPop());
                                taskPtr->Run();
                        }
                        catch(const QueueEmptyException&)
                        {
                                std::this_thread::yield();
                        }
                }
        }

        template<typename TaskReturnType>
        void TaskSystem<TaskReturnType>::Stop(void)
        {
                this->shouldStop.store(true);

                while(not this->taskQueue.IsEmpty() )
                {
                        try
                        {
                                TaskPtr taskPtr = *(this->taskQueue.TryPop());
                                taskPtr->Interrupt();
                        }
                        catch(...)
                        {
                                std::this_thread::yield();
                        }
                }
        }
        template<typename TaskReturnType>
        TaskSystem<TaskReturnType>::~TaskSystem()
        {
                this->shouldStop.store(true);

                for(size_t i=0; i < this->listOfThreads.size(); ++i)
                {
                        if ( this->listOfThreads[i].joinable() )
                                this->listOfThreads[i].join();
                }
        }

};


One can see that when the TaskSystem::Start() is called, TaskSystem will spawn threads with its default value equal to the hardware processors. Each thread runs function TaskSystem::WorkerThread() which will try to pop a task from ThreadSafeQueue (see "C++ Concurrency In Action"), and run that task.


Dividing data

   There're two kinds of situation that the data are divided:

1. Dividing data into chunks and each chunk is processed by one thread. For example, you have a list of data that need to be summed up. Suppose that you have four processors, you can divide the data into four groups. Then, you can define a Task that contained a group of data, and override the TaskInterface::Run() to summed up the data. In this case, dividing data is easy and is the ideal way to process the data in parallel.


2. Dividing data recursively: For the algorithms that use Divide-and-Conquer belong to this category. In this case, the TaskSystem (or, the ThreadPool) often get into trouble because of the absent of the Task-Based mutex and the incapable to perform 'Context Switch' between the tasks. This will be discussed in the next section.


Example: Parallel Merge Sort

The pseudocode of parallel merge sort is shown as follows:
ListType ParallelMergeSort(ListType inputList)
{
    ListType leftHalfList, rightHalfList = inputList.splitInHalf();
    spawn ParallelMergeSort(leftHalfList);
    spawn ParallelMergeSort(rightHalfList);

    sync;
    ListType result = Merge(leftHalfList, rightHalfList);
    return result;
}
    The ParallelMergeSort() first split the input list, then spawn two thread to process each half lists, wait for their result, and finally, Merge() the two half lists.
    However, this may yield dead lock if there is no available thread to run the two spawned tasks: The parent task is waiting for the two spawned tasks. The two child tasks, however, has no available thread to process their data. And since there's no 'Context Switch' for  task, there's no way to take the parent task off and run the two child tasks. Finally, dead lock happen.
    In the following, I try to make an another approach to the parallel merge sort by using following strategies:
1. Use single thread to do the recursive call.
2. Submit the Merge-part into TaskSystem to run in parallel.
The Code is shown below:
        template<typename ListType>
        future<ListType> ParallelMergeSort(ListType&& inputList_, TaskSystem<ListType>& taskSystem)
        {
                size_t numberOfElements = inputList_.size();

                if (numberOfElements > 2)
                {
                        typename ListType::iterator middlePoint = inputList_.begin();
                        std::advance(middlePoint, numberOfElements/2);

                        ListType leftList;
                        leftList.splice(leftList.begin(),
                                        inputList_, inputList_.begin(), middlePoint);
                        ListType rightList;
                        rightList.splice(rightList.begin(),
                                         inputList_, inputList_.begin(), inputList_.end());

                        future<ListType> leftSortedResult = ParallelMergeSort( std::move(leftList), taskSystem);
                        future<ListType>> rightSortedResult = ParallelMergeSort( std::move(rightList), taskSystem);

                        MergeTask<ListType> mergeTask( std::move(leftSortedResult), std::move(rightSortedResult) );
                        future<ListType> finalResult = mergeTask.GetResult();
                        taskSystem.Submit( std::make_shared< MergeTask<ListType> >(std::move(mergeTask)) );

                        return finalResult;
                }
                else if (numberOfElements == 2)
                {
                        ListType result;
                        result.splice( result.begin(), inputList_, inputList_.begin() );
                        if ( (*result.begin()) <= (*inputList_.begin()) )
                        {
                                result.splice(result.end(), inputList_, inputList_.begin());
                        }
                        else
                        {
                                result.splice(result.begin(), inputList_, inputList_.begin());
                        }

                        std::promise<ListType> resultHolder;
                        resultHolder.set_value( std::move(result) );

                        return resultHolder.get_future();
                }
                else
                {
                        std::promise<ListType> resultHolder;
                        resultHolder.set_value( std::move(inputList_) );

                        return resultHolder.get_future();
                }

        }


   This function takes two arguments: the first arguments required the user to move the std::List object to it (the '&&' is the Move semantics which can reserve the time to copy object), and the second is the reference to TaskSystem (where the merge tasks can be submitted to). The return value is std::future, which contained the sorted result.
    Inside the function, if the number of list elements > 2, it split the list by half and call the ParallelMergeSort() recursively till the list elements <=2. When the number of list elements ==2, it sort the element with ease, then return the result that wrapped by std::future. After finish the right and left recursive call, the function create a MergeTask and submit it to TaskSystem. The MergeTask then merge the two lists in parallel. Note that when I declare the ListType::iterator middlePoint, I add "typename" before the declaration since the "iterator" is depend on the template parameter "ListType" (see Effective C++ 3rd, Item 42).

   The MergeTask is implement as follows:
        template<typename ListType>
        class MergeTask : public TaskInterface<ListType>
        {
                public:
                        virtual void Run() override
                        {

                                ListType result;

                                ListType leftList = this->leftListHolder.get();
                                ListType rightList = this->rightListHolder.get();

                                while( (not leftList.empty())||(not rightList.empty() ) )
                                {
                                        if( *(leftList.begin()) <= *(rightList.begin()) )
                                        {
                                                result.splice(result.end(), leftList, leftList.begin() );
                                        }
                                        else
                                        {
                                                result.splice(result.end(), rightList, rightList.begin() );
                                        }

                                        if (leftList.empty())
                                        {
                                                result.splice(result.end(), rightList);
                                                break;
                                        }
                                        else if (rightList.empty())
                                        {
                                                result.splice(result.end(), leftList);
                                                break;
                                        }
                                }
                                this->resultHolder.set_value( std::move(result) );
                        }

                        virtual future<ListType> GetResult() override
                        {
                                return this->resultHolder.get_future();
                        }

                        virtual void Interrupt() override
                        {
                                TaskInterruptException interruptException;
                                this->resultHolder.set_exception( std::make_exception_ptr(interruptException) );
                        }

                        // Constructors
                        MergeTask(future<ListType>&& leftListHolder_, future<ListType>&& rightListHolder_)
                                : resultHolder(),
                                  leftListHolder( std::move(leftListHolder_) ),
                                  rightListHolder( std::move(rightListHolder_) )
                        {
                        }
                        MergeTask(MergeTask&& other_)
                                : resultHolder( std::move(other_.resultHolder) ),
                                  leftListHolder( std::move(other_.leftListHolder) ),
                                  rightListHolder( std::move(other_.rightListHolder) )
                        {
                        }

                        MergeTask(const MergeTask&) = delete;

                        virtual ~MergeTask() {};

                private:
                        std::promise<ListType> resultHolder;
                        future<ListType> leftListHolder;
                        future<ListType> rightListHolder;
        }; // End of class

    In MergeTask, the whole Merge job is define in Run(). This task should be initialized by given two std::future that represent the left-half-list and right-half-list, respectively. When this task is about to merge, it synchronize the two half lists by calling std::future::get(). The calculation result can be obtained from calling MergeTask::GetResult() and the caller will get a std::future which can be synchronized latter.
    This class also use std::promise, which can be image as a summon circle between the caller thread and the calculation thread. Once the calculation thread finish its calculation, it will call std::promise::set_value(), then the result will be transport to the std::future (which can be obtained by calling std::promise::get_future()) in the caller thread.

   The overall procedure to run parallel merge sort is shown as below:
int main()
{
        TaskSystem<ListType> taskSystem;
        taskSystem.Start();

        future<ListType> resultHolder = ParallelMergeSort( std::move(listToBeSorted), taskSystem );
        ListType result = std::move( resultHolder.get() );

        return 0;
}

Result

    Under the above approximation, calling the ParallelMergeSort() will not yield dead lock. However, the efficiency of such ParallelMergeSort() is even slower than the serial one. This may because of nature of the Divide-and-Conquer algorithms that the parent task (the task who spawn other tasks) should wait for its child tasks finished so that it can start to work. Moreover, the result of the child task should also be moved to its parent task which also harshly effect the performance (i.e. the Cache-Ping-Pong).

Conclusion

    This article is temp to implement the TaskSystem with some limitations. In the lower half of this article, I give a example that use TaskSystem to perform parallel merge sort. Although the TaskSystem seems not improve the performance in such approximation, it may get better performance if we don't use the algorithm that divided data recursively.
 
2016.06.01
Joshua P. R. Pan

2016年1月29日 星期五

Unity: How to Serialize Dictionary

Background

    Change Language version of game is often pain in the ass, since each UI image and Audio clips should also be changed. Somebody use subversion (to treat different language version as different branches) to solve this problem. However, it might be inconvenient if you change language version very often.
    Instead, we use Data Center to keep the reference to each UI assets. This Data Center record a Key-Value-Pair in which the Key is the language-independent name of a certain UI, while the Value is the UI Prefab (which is language-dependent, since different language version can have different assets) of that UI.  In the game, if someone want to use that UI, he could send the key (the language-independent name of that UI) to Data Center, and ask for that Prefab. Finally, you can create different Data Center for different language version, and each Data Center can have the same Key while the relative Value different.
   For example, the following figure shows the Data Center for Chinese version.  The key (left-hand-side) "WarningPagePanel" will be universal for different language version Data Centers (so that you don't need to change the images in each scene when you want to change language version), and the value (right-hand-side) is the Chinese version prefab for "WarningPagePanel" (and for Chinese prefab, we have "_CN" in the suffix).
If we want to show some UI in the game, we can stuff the key to a certain script (we call DynamicLoadableUI) which can take the key to get the UI prefab from UI Data Center when we edit the scene.

   To implement such Data Center, I need a Serializable Dictionary that can stuff key-value in and can serialize its data into disk. However, Unity does not provide such Serializable Dictionary. This is what is article aiming for.

Solution

    At first, here is a solution posted by christophfranke123 .  When I implement the Serializable Dictionary by this method, however, I will get "IndexOutOfRangeException" if there're too many Key-Value-Pairs (13 in our case) and I want to add new pair.  I found this might due to the dictionary provide by C# is not thread safe and Unity may use different thread to modify and display the dictionary.  Thus I modify the SerializableDictionary provide by christophfranke123 as below:
[Serializable]
public abstract class SerializableDictionary : ISerializationCallbackReceiver
{
    private System.Object mutexForDictionary = new System.Object();
    private Dictionary dictionary = new Dictionary();

    [SerializeField] private List listOfKeys = new List();
    [SerializeField] private List listOfValues = new List();

#region Serialization Related
    public void OnBeforeSerialize()
    {
        lock (this.mutexForDictionary)
        {
            this.listOfKeys.Clear();
            this.listOfValues.Clear();

            foreach (KeyValuePair eachPair in this.dictionary)
            {
                this.listOfKeys.Add(eachPair.Key);
                this.listOfValues.Add(eachPair.Value);
            }
        }
    }

    public void OnAfterDeserialize()
    {
        lock (this.mutexForDictionary)
        {

            this.dictionary.Clear();
            checkIfKeyAndValueValid();

            for (int i = 0; i < this.listOfKeys.Count; ++i)
            {
                this.dictionary.Add(this.listOfKeys[i], this.listOfValues[i]);
            }
        }
    }
#endregion

#region Dictionary Interface
    public void Add(K _key, V _value)
    {
        lock (this.mutexForDictionary)
        {
            this.dictionary.Add(_key, _value);
        }
    }
    public V this[K _key]
    {
        get 
        {
            lock (this.mutexForDictionary)
            {
                return this.dictionary[_key];
            }
        }
        set 
        {
            lock (this.mutexForDictionary)
            {
                this.dictionary[_key] = value;
            }
        }
    }
    public void Remove(K _key)
    {
        lock (this.mutexForDictionary)
        {
            this.dictionary.Remove(_key);
        }
    }
    public KeyValuePair ElementAt(int _elementIndex)
    {
        lock (this.mutexForDictionary)
        {
            return this.dictionary.ElementAt(_elementIndex);
        }
    }
    public int Count
    {
        get
        {
            lock (this.mutexForDictionary)
            {
                return this.dictionary.Count;
            }
        }
    }

#endregion

    private void checkIfKeyAndValueValid()
    {
        int numberOfKeys = this.listOfKeys.Count;
    
&nbsp &nbsp &nbsp &nbsp int numberOfValues = this.listOfValues.Count;

        if (numberOfKeys != numberOfValues)
        {
            throw new System.ArgumentException("(nKey, nValue) = ("
                                        + numberOfKeys.ToString() + ", " 
                                        + numberOfValues.ToString() + ") are NOT Equal!");
        }
    }
}//End of class


Note

   If you want to customize the Editor for SerializableDictionary (such as what I did in UI_DataCenter), you should note that if you edit of SerializableDictionary (such as drag a new GameObject to its inspector), Unity will not be aware of that. When you leave the scene, Unity will not warn you to save scene after change. Therefore, you might find nothing is record when you enter that scene in the next time. Also, even if you save scene after you change the SerializableDictionary (by press "Ctrl+S", or by "File->Save Scene"), Unity will not actually save that scene (since it does not notice that something is changed).
   To solve this, you should call "EditorApplication.SaveScene();" in the same way as you call the "EditorUtility.SetDirty(this.target);":
 [CustomEditor(typeof(UI_DataCenter))]
 public class UI_DataCenterEditor : Editor
 {
   public override void OnInspectorGUI()
   {
      GUI.changed = false;

      DisplayEachElementOfSelectedDictionary();
      DisplayNewDictionaryElementCreatePanel();

      if (GUI.changed)
      {
         EditorUtility.SetDirty(this.target);
         EditorApplication.SaveScene();
      }

   }
 }